Recording Acoustic Guitar
by Doug Young
I learned a lot from the process of recording my Laurel Mill CD. Before I forget what I learned, I want to write it down in case it can help anyone else.
First Pass: In the recording studio
My intention when I started was to go to a good recording studio to record. Although I had done some home recording before, I figured I should focus on the music, and let a pro handle the technical details. Also, I wanted the best quality I could from this project, and my home recordings certainly haven’t been pro quality. I don’t have the equipment, the room, or the ears.
On a recommendation, I went to Highland Studios, run by Joe Weed. Highland was created specifically for acoustic music, and has a great sounding room. Joe was terrific to work with as well. We recorded three tunes in the first session. The sound was wonderful, Joe took care of all the details, and it was all pretty easy. Perhaps too easy. I thought I’d played well, and went home happy. But when I got home to listen to the tracks, I was less than thrilled. The recording sounded great, Joe had done a terrific job. But my playing was far from what I wanted. I hadn’t made blatant mistakes, but tempos were all over the map, phrasing was not as good as I’d like, and so on.
I did learn a lot from the time in the studio. Joe used 4 mics, a pair of Neumann U89s, about 2 feet away from the guitar and maybe 3 feet apart, and 2 KM184s, in an X/Y setup, right in front of me, also about 2 feet away. He gave me some tips on using Pro Tools, editing, organizing my files, using reverb, and more, and sent me home with complete Pro Tools sessions for everything, even the sound checks and my warm up doodling. And of course, I learned that I perhaps needed some more work before I was ready to record.
Restart
At first, I considered just practicing for a few more years before I went back to Highland to try again. But then I began to think that part of the value of making the CD was focusing on getting my playing to the level I wanted, and that I could probably do that best at home, where I could record, listen, practice, then record again. At the least, until I got a demo recording on which I played the way I wanted to play, I probably wasn’t ready to tackle the studio again. But I also suspected I should be able to get a decent recording at home. I decided it was a reasonable compromise if I could get an acceptable (maybe not great) sound, but with a better performance.
I spent a fair amount of time rummaging around on the internet, reading rec.audio.pro, and so on. That’s dangerous, because a lot of the people that post there are audio pros, and a little reading will quickly convince you that you need microphones that cost more than your guitars (and that’s just the start). But I also learned a lot about microphone placement, room acoustics, and so on, as well as learning more about equipment. My experience with Joe Weed was also very helpful, in that I saw what he had done (although the micing technique he used worked best in a great sounding room – something I didn’t have.) With that background, I started putting together my recording setup.
Equipment
I decided on a couple of pieces of equipment, to raise the level of what I had. Since I was only recording an acoustic solo guitar, I opted for a setup that recorded only two tracks, but at high quality. I already had a pair of Neumann KM184s. I added a Great River preamp, and an Alesis Masterlink recorder. The Masterlink is meant to be a mastering deck. It only records two tracks, at the same time. But it can record at up to 96Khz and 24 bits, is dead quiet (important if I was to be sitting beside it recording), and was relatively inexpensive (I got mine for $800). I put the equipment in a small rack case, so I could take it anywhere I needed to go to record.
Finding a Room
The next issue was identifying a place to record. I considered finding a building, maybe a church, that had a good sound. But going somewhere else was pretty much like going to a studio. I wanted the convenience of being at home, able to record anytime, even for a few minutes, then listening to the results.
I have a room that I use for practice, where I have my guitars, and so on. It seemed the most convenient, but it’s a small room (spare bedroom) and on my first try recording, I found that the other guitars tended to resonate and be picked up on the recording. If I had to move my guitars every time I recorded, things wouldn’t be so convenient. I tried most of the rooms in my house, even the bathroom. The bathroom sounds great when I play in there, like singing in the shower. When recorded, however, the sound was decidedly “tubby”. The living room was not bad sounding, tho it was a bit lively. Of course, my wife said no to the idea of adding Aurelex to the living room walls! Also, it was sort of in the middle of traffic, and therefore less than ideal for focusing on recording.
Finally, I tried the garage. Our garage is a bit unusual. It has been soundproofed and is used by my son’s punk rock band, The Muckruckers, as a practice space. The soundproofing wasn’t done in the interest of sounding good, of course, it was to keep the neighbors from kicking us out of the neighborhood. The room is very dead, all carpeted and padded, floors, walls, ceiling. I wasn’t too optimistic, my guitars sounded rather lifeless out there. Also, there was the furnace and water heater. Even when not running, the pilot flames could be faintly heard. However, a few test recordings convinced me that this room was my best bet. At the advice of John Stone, who was gracious enough to listen to a few early takes and give me some feedback, I added some reflective surfaces (sheets of plastic) around my recording area, which helped a bit with the deadness of the room. In fact, John had suggested this, but I hadn’t acted on the idea, until I tried to record a tune that I needed some music for. I placed a music stand in front of me, right behind the mics. When I listened back, I immediately noticed a much more lively sound than I had been getting.
Mics and Mic Placement
With the room selected, I moved onto mic positioning. Since the room itself was not going to add much to the recording, I focused primarily on close micing. I started by recording lots of sample sounds, using different guitars and all sorts of mic positions. I tried spaced pairs, X/Y, ORTF, NOS, a mic in front and one by my ear, one above the guitar and one below, and so on. I also tried different distances from the guitar, from almost touching to 3 or 4 feet away. Combined with trying different guitars, this made for huge number of sample recordings. I kept these short, usually only playing a few bars. One resource on the web that was very helpful for learning about my options in micing the guitar was Harvey’s Gerst’s “Big Thread” document, originally found at www.homerecording.com
I also spent a lot of time listening to all my favorite CDs, but focusing on the sound. I heard a lot of things I’d never really noticed when listening for the music. I’d notice the reverb, or finger squeaks, and so on, as well as just the tone. I found that a lot of CDs I like, based on the music, didn’t necessarily have a tone that I wanted to emulate. (Probably a good lesson – the music matters more than the sound, but at this moment I was focused on tone).
In my previous efforts at recording guitar I had tended toward using spaced pairs, hoping for a bigger stereo sound, and so I initially focused this type of mic setup. (My favorite sound from the Highland session was also the U89s as spaced pairs) But in the very dead room and with close micing, I started to notice some issues. The slightest motion of the guitar resulted in an image shift on the recording. The sound wasn’t stable; sometimes it moved back and forth between the speakers. There also seemed to be a subtle “hole in the middle” effect. It wasn’t like I was listening to one guitar with a big stereo spread, it was more like sound was coming from two different speakers.
Also, I noticed that one of the CDs I picked as having a sound I wanted to aspire to, Laurence Juber’s Altered Reality, was apparently recorded with an X/Y setup. Once I tuned into this sound, I found it to have many very nice characteristics, very focused, yet with a definite stereo effect. Ultimately, after a week or so of experimenting and listening, I converged on the ORTF arrangement, basically a slightly wider version of X/Y. X/Y is an example of “coincident pairs”, while ORTF is referred to as “near coincident”. The mics are about 7 inches apart facing away from each other at a 110 degree angle. Here’s a more detailed explanation and diagrams of this technique. I also settled on a distance of about 8″ from the guitar as having the sound I was looking for.
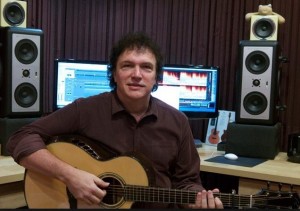
So I set myself up, as far away from the furnace as I could, amidst the Marshalls, electric guitars and other band paraphernalia of my son’s band. I had to move out periodically when they would want to practice, so I marked off the spots on the floor for the mic stands and my chair with tape, so I could return to the right setup quickly. The photo to the right shows my recording environment, with the band mascot perched overhead. Not exactly what I expected a recording environment for an acoustic fingerstyle project to look like, but it was home.
You can see the Masterlink in a rack on the stool, my Guitar Chair, and the mics at the right edge of the photo. I quickly found I needed a wind screen over one of the mics because I kept breathing on it, causing a very loud crashing sound that would completely ruin the recording.
Editing
I tried to make each take complete, but ultimately did some minor editing using SoundForge on a PC. SoundForge makes it easy to remove some small noises and make other fixes that would ruin an otherwise good take. I was able to read the Masterlink files directly into SoundForge, so everything stayed digital at the high sample rate.
Mastering
Since I ended up recording this CD myself, in a less than optimal environment, I wanted to be sure to add professional mastering to the process before release. After looking around, I decided on David Glasser at Airshow Mastering in Boulder, CO. David has done some of Al Petteway’s CDs, and Al’s sound was one of the ones I had selected as a goal to aspire to. Airshow has many good references involving folk and acoustic music, so I was confident they’d know what I was looking for. There are lots of Mastering studio out there, but so many are advertising that they can “guarantee your CD will be louder than anyone else”, and so on. That might be great for my son’s punk band, but was definitely not what I was looking for for this recording. David was very helpful, and the entire process went smoothly, and added a lot to the sound of the final CD.
Packaging
Finally, the last step was packaging. I shopped around a bit, but ended up using Discmakers. They’re near by and I could run in and talk to a real person. I gave them a bunch of digital pictures I had taken and they took it from there. For the cover, they used a couple of photos I had taken at the Laurel Mill Lodge in Los Gatos, which was appropriate for the title. One of my favorite photos is the picture of the Kathy Wingert guitar on back of the CD. I just took this photo of the guitar laying in the grass in my back yard. I didn’t think the original photo was very good, but the artists at Discmakers cropped it and made it look like a great shot.
Doug Young won the first prize of the International Acoustic Music Awards (Instrumental) a few years ago. This article is written by Doug Young
For more information on IAMA (International Acoustic Music Awards), go to: http://www.inacoustic.com